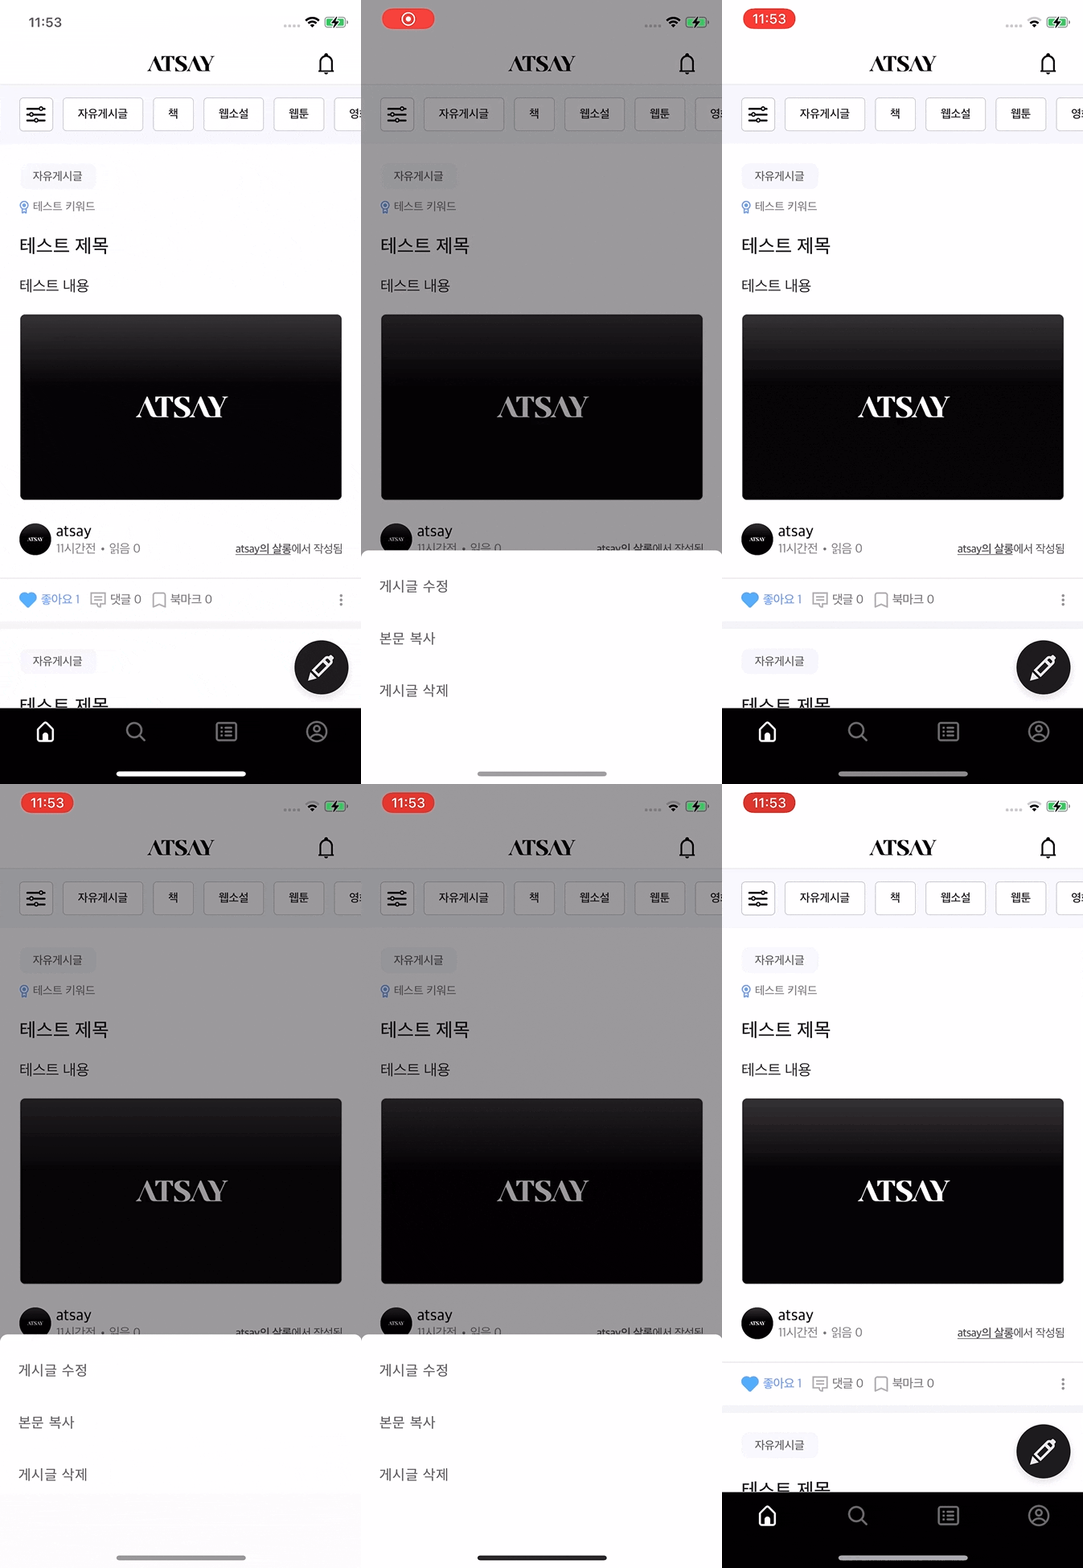
하나의 스크린에서 부가적인 기능 또는 정보를 제공하기 위해 아래와 같은 BottomSheet가 사용됩니다.

React Native에서 사용할 수 있는 BottomSheet 라이브러리는 'react-native-reanimated-bottom-sheet'라는 라이브러리가 있습니다.
https://github.com/osdnk/react-native-reanimated-bottom-sheet
위 라이브러리를 이용할 때 BottomSheet의 높이에 따라 background 색상을 변경시키는 설명은 아래 링크에 나와 있습니다.
저는 처음 BottomSheet를 접했을 때 위 라이브러리를 이용했습니다.
해당 라이브러리는 간단하게 바텀 시트 기능을 구현할 수 있는 장점이 있습니다.
하지만 저의 경우 해당 라이브러리로 기능을 구현한 후 코드가 복잡해지는 경험을 했고, 향후 유지보수 및 코드 확장을 위해 BottomSheet를 직접 구현하기로 결정했습니다.
BottomSheet를 구현할 때 아래의 글을 참고해서 구현했습니다.
https://medium.com/@ndyhrdy/making-the-bottom-sheet-modal-using-react-native-e226a30bed13
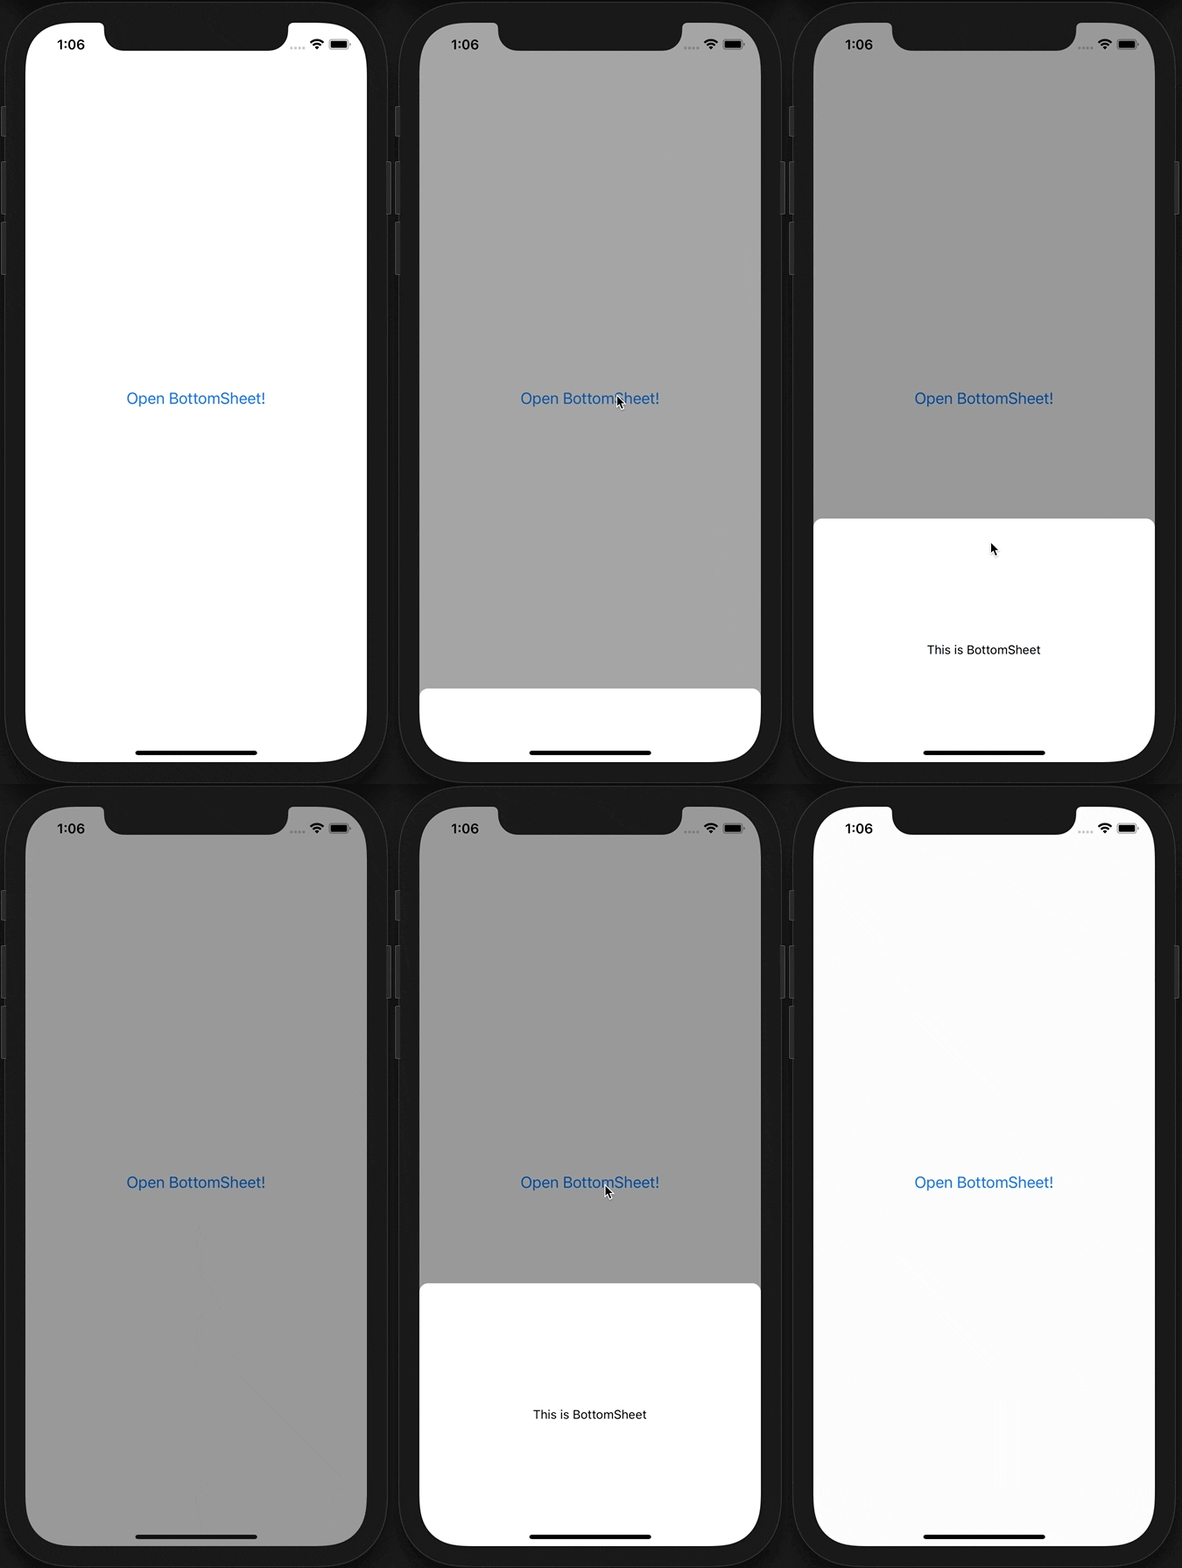
구현 예시

구현해야 할 효과 및 기능
1. 아래에서 위로 올라오는 애니메이션 & 위, 아래로 드래그할 수 있는 애니메이션 효과
2. BottomSheet가 올라왔을 때 뒤 배경이 흐려지는 효과
3. BottomSheet 외의 영역 터치 시 BottomSheet가 내려가는 기능
1. 애니메이션 효과 구현
유저의 터치와 드래그에 따라 View의 위치를 변화시켜야 합니다.
따라서 BottomSheet는 Animated.View를 사용하고 style 값의 trasnlateY 속성에 Animated.Value를 지정합니다.
유저의 터치를 인식하기 위해서 PanResponder을 사용합니다.
PanResponder의 자세한 설명은 공식 문서에 있습니다.
https://reactnative.dev/docs/panresponder
구현해야 할 BottomSheet의 동작 방식은 아래와 같습니다.
- 유저가 아래 방향으로 드래그할 때 BottomSheet의 위치가 변경돼야 합니다.(위 방향으로 드래그할 때는 위치가 바뀌지 않습니다.)
- 유저가 BottomSheet 영역에서 손을 뗄 때 BottomSheet가 닫히거나 열리도록 해야 합니다.
    const screenHeight = Dimensions.get("screen").height;
    const panY = useRef(new Animated.Value(screenHeight)).current; //
    const translateY = panY.interpolate({ // panY에 따라 BottomSheet의 y축 위치를 결정합니다.
    	inputRange: [-1, 0, 1], // inputRage의 -1을 outpuRage의 0으로 치환하기 때문에 panY가 0보다 작아져도 BottomSheet의 y축 위치에는 변화가 없습니다.
    	outputRange: [0, 0, 1],
    });

    const resetBottomSheet = Animated.timing(panY, { // BottomSheet를 초기 위치로 움직이는 함수입니다.
        toValue: 0,
        duration: 300,
        useNativeDriver: true,
    });

    const closeBottomSheet = Animated.timing(panY, { // BottomSheet를 내리는 함수입니다.
        toValue: screenHeight,
        duration: 300,
        useNativeDriver: true,
    });

    const panResponders = useRef(PanResponder.create({
        onStartShouldSetPanResponder: () => true,
        onMoveShouldSetPanResponder: () => false,
        onPanResponderMove: (event, gestureState) => { // BottomSheet에 터치 또는 드래그 이벤트가 발생할 때 실행됩니다.
            panY.setValue(gestureState.dy); // 처음 터치 영역을 기준으로 y축으로 드래그한 거리를 panY에 저장합니다.
        },
        onPanResponderRelease: (event, gestureState) => { // 유저가 BottomSheet 손을 뗐을 때 실행됩니다.
            if(gestureState.dy > 0 && gestureState.vy > 1.5) { // 유저가 y축으로 1.5 이상의 속도로 드래그 했을 때 BottomSheet가 닫히도록 조건을 지정했습니다.
                closeModal();
            }
            else { // 위 조건에 부합하지 않으면 BottomSheet의 위치를 초기화 하도록 설계했습니다.
                resetBottomSheet.start();
            }
        }
    })).current;

    ...

    return (
        <Modal
            visible={modalVisible}
            animationType={"fade"}
            transparent
            statusBarTranslucent
        >
            ...
                <Animated.View
                    style={{...styles.bottomSheetContainer, transform: [{ translateY: translateY }]}} // translateY 값을 지정해 BottomSheet의 위치를 조정합니다.
                    {...panResponders.panHandlers}
                >
                    <Text>This is BottomSheet</Text>
                </Animated.View>
            ...
        </Modal>
    )

    ...


const styles = StyleSheet.create({
    ...
    bottomSheetContainer: {
        height: 300,
        justifyContent: "center",
        alignItems: "center",
        backgroundColor: "white",
        borderTopLeftRadius: 10,
        borderTopRightRadius: 10,
    }
})
2. BottomSheet가 올라왔을 때 뒤 배경이 흐려지는 효과
해당 효과는 Modal의 속성을 이용하면 쉽게 구현할 수 있습니다.
- 뒤 배경이 흐려지는 효과: Modal의 animationType props에 fade type을 사용합니다.
- 뒤 배경에 이전 스크린이 보이는 효과: Modal의 transparent props를 true로 지정합니다.
=> 추가로 Modal 내부 View의 backgroundColor를 회색 계열로 지정하면 그림자처럼 구현할 수 있습니다.
※안드로이드의 경우 statusbar에 해당 효과를 적용하기 위해서는 'statusBarTranslucenet' props를 지정하면 됩니다.
return (
        <Modal
            visible={modalVisible}
            animationType={"fade"} // 뒷 배경이 자연스럽게 흐려지는 효과 props
            transparent // 뒷 배경을 투명으로 만드는 효과 props
            statusBarTranslucent // 안드로이드 statusBar에 효과를 적용시키기 위한 props
        >
            <View style={styles.overlay}>
                ...
            </View>
        </Modal>
    );


const styles = StyleSheet.create({
    ...
    overlay: {
        flex: 1,
        justifyContent: "flex-end",
        backgroundColor: "rgba(0, 0, 0, 0.4)"
    },
    ...
})
3. BottomSheet 외의 영역 터치 시 BottomSheet가 내려가는 기능
BottomSheet 바깥 영역에 onPress 이벤트를 지정하면 쉽게 구현 가능합니다.
onPress 이벤트 내부에 BottomSheet 가 닫히는 기능과 Modal이 사라지는 기능을 구현하면 됩니다.
...

const closeBottomSheet = Animated.timing(panY, {
        toValue: screenHeight,
        duration: 300,
        useNativeDriver: true,
    });

...

const closeModal = () => {
        // BottomSheet가 닫힌 후 Modal이 사라지도록 기능 구현
        closeBottomSheet.start(()=>{
            setModalVisible(false);
        })
    }

return (
        <Modal
            visible={modalVisible}
            animationType={"fade"}
            transparent
            statusBarTranslucent
        >
            <View style={styles.overlay}>
                <TouchableWithoutFeedback
                    onPress={closeModal} // onPress 이벤트 등록
                >
                    <View style={styles.background}/>
                </TouchableWithoutFeedback>
                <Animated.View
                    style={{...styles.bottomSheetContainer, transform: [{ translateY: translateY }]}}
                    {...panResponders.panHandlers}
                >
                    <Text>This is BottomSheet</Text>
                </Animated.View>
            </View>
        </Modal>
    )
}

const styles = StyleSheet.create({
    ...
    background: {
        flex: 1,
    },
    ...
})
전체 코드
테스트 예시를 만들기 위해 두 개의 파일을 사용됐습니다.
- BottomSheetTestScreen.js: Button과 BottomSheet로 이루어진 스크린
- BottomSheet.js: BottomSheet를 구현한 컴포넌트
BottomSheetTestScreen.js
import React, { useState } from 'react';
import {
    View,
    StyleSheet,
    Button
} from 'react-native';
import BottomSheet from './BottomSheet';

const BottomSheetTestScreen = (props) => {
    const [ modalVisible, setModalVisible ] = useState(false);
    const pressButton = () => {
        setModalVisible(true);
    }

    return (
        <View style={styles.rootContainer}>
            <Button
                title={"Open BottomSheet!"}
                onPress={pressButton}
            />
            <BottomSheet
                modalVisible={modalVisible}
                setModalVisible={setModalVisible}
            />
        </View>
    )
}

const styles = StyleSheet.create({
    rootContainer: {
        flex: 1,
        justifyContent: "center",
        alignItems: "center",
    }
})

export default BottomSheetTestScreen;
BottomSheet.js
import React, { useEffect, useRef } from 'react';
import {
    View,
    StyleSheet,
    Text,
    Modal,
    Animated,
    TouchableWithoutFeedback,
    Dimensions,
    PanResponder
} from 'react-native';

const BottomSheet = (props) => {
    const { modalVisible, setModalVisible } = props;
    const screenHeight = Dimensions.get("screen").height;
    const panY = useRef(new Animated.Value(screenHeight)).current;
    const translateY = panY.interpolate({
        inputRange: [-1, 0, 1],
        outputRange: [0, 0, 1],
    });

    const resetBottomSheet = Animated.timing(panY, {
        toValue: 0,
        duration: 300,
        useNativeDriver: true,
    });

    const closeBottomSheet = Animated.timing(panY, {
        toValue: screenHeight,
        duration: 300,
        useNativeDriver: true,
    });

    const panResponders = useRef(PanResponder.create({
        onStartShouldSetPanResponder: () => true,
        onMoveShouldSetPanResponder: () => false,
        onPanResponderMove: (event, gestureState) => {
            panY.setValue(gestureState.dy);
        },
        onPanResponderRelease: (event, gestureState) => {
            if(gestureState.dy > 0 && gestureState.vy > 1.5) {
                closeModal();
            }
            else {
                resetBottomSheet.start();
            }
        }
    })).current;

    useEffect(()=>{
        if(props.modalVisible) {
            resetBottomSheet.start();
        }
    }, [props.modalVisible]);

    const closeModal = () => {
        closeBottomSheet.start(()=>{
            setModalVisible(false);
        })
    }

    return (
        <Modal
            visible={modalVisible}
            animationType={"fade"}
            transparent
            statusBarTranslucent
        >
            <View style={styles.overlay}>
                <TouchableWithoutFeedback
                    onPress={closeModal}
                >
                    <View style={styles.background}/>
                </TouchableWithoutFeedback>
                <Animated.View
                    style={{...styles.bottomSheetContainer, transform: [{ translateY: translateY }]}}
                    {...panResponders.panHandlers}
                >
                    <Text>This is BottomSheet</Text>
                </Animated.View>
            </View>
        </Modal>
    )
}

const styles = StyleSheet.create({
    overlay: {
        flex: 1,
        justifyContent: "flex-end",
        backgroundColor: "rgba(0, 0, 0, 0.4)"
    },
    background: {
        flex: 1,
    },
    bottomSheetContainer: {
        height: 300,
        justifyContent: "center",
        alignItems: "center",
        backgroundColor: "white",
        borderTopLeftRadius: 10,
        borderTopRightRadius: 10,
    }
})

export default BottomSheet;
읽어주셔서 감사합니다.
혹시 본 게시글 중 틀린 내용이 있다면 댓글을 통해 알려주세요 :)
'Frontend > React-Native' 카테고리의 다른 글
| [React Native] Collapsible View 만들기 (0) | 2021.07.11 |
|---|---|
| [React Native] react-native-reanimated v2 설치 (4) | 2021.06.22 |
| [React Native] Splash 스크린 사용 시 Ios 기기 멈춤 현상 (0) | 2021.05.24 |
| [React Native] import com.google.firebase.iid.FirebaseInstanceId; Not Found(Android) (0) | 2021.05.12 |
| [React Native] 입력창-키보드 겹치는 문제 - ios (5) | 2021.04.27 |